Monday, June 27, 2011

What's great about it

I know that I write about goodies, snacks, and treats, quite a bit. I like to write about them, and obviously you like to read about them because those topics get way more views than dinners, side dishes, or vegetables. I can't imagine how low the page views would be if I wrote about a new salad.... I think this is funny, because hopefully we all make dinners, and side dishes, and vegetables, and even salads, but nobody wants to read about them as much as we want to read about delicious desserts, candy, donuts, or other pastries and/or confectioneries.
I personally spend most of my time in those areas of cookbooks, I feel giddy flipping through pages of pictures of delicious-looking, cakes, pies, danishes, cream puffs, and tarts. (I don't buy cookbooks that don't have pictures...lots and lots of pictures) And there is a new treat that I have discovered, that I wanted to share here. Since it's discovery, I have had multiple requests for it, a few for the recipe, and I think it is absolutely delicious.
It is a cappuccino flavored biscotti, with hazelnuts and chocolate chips. This is a little different than the biscotti you are used to, because it is not quite as hard. There is a definite coffee flavor, not like a lot of things that have a coffee title, and it is not overly sweet, which means you can eat more ;).
Of course you can switch up the biscotti, omit the espresso powder, add white chocolate and cranberries, dip it in something, add dried apricots and almonds, etc. You get the idea. I love recipes like this that I can improvise on. Even though I haven't felt the urge yet...it may happen someday. This recipe calls for espresso powder, which can be found in the imported section of the grocery store. It really makes the difference in this recipe, but if you CANNOT get it or whatever, use finely ground coffee. It's not as good but it will do in a pinch.


Cappuccino Biscotti with Hazelnuts and Chocolate
from Cindy Mushet's The Art and Soul of Baking

1 1/2 teaspoons instant espresso powder
2 teaspoons warm water
1 stick butter, softened
2/3 cup sugar
3 eggs, room temperature
2 1/4 cups flour
1/2 teaspoon baking powder
1/4 teaspoon salt
1 cup chopped skinned hazelnuts (toasted if desired)
1 cup semi-sweet chocolate chips

1/2 cup sugar
1/2 teaspoon cinnamon

Preheat oven to 350 and position an oven rack in the center.
In a small bowl, stir together the espresso powder and warm water until the powder is dissolved. Set aside.
Place the butter and granulated sugar in the bowl of the stand mixer and beat on medium speed until smooth and slightly lightened in color, 2 to 3 minutes. Add the espresso mixture and blend well. Scrape down the bowl with the spatula. Add the eggs, one at a time, beating after each addition.
In the medium bowl, whisk together the flour, baking powder, and salt. Add to the butter mixture all at once. Turn the mixer to the lowest speed and blend slowly, just until there are not more patches of flour. Scrape down the bowl.
Add the hazelnuts and chocolate chips and mix on low just until blended. Remove the bowl from the mixer and stir gently a few times to make sure the nuts and chips are evenly distributed and there are no more patches of unincorporated flour or butter.
Divide the dough in half. On a floured work surface, gently squeeze and roll each piece to shape into logs about 13 inches long. Line one baking sheet with parchment paper. Place the logs on the sheet about 4 inches apart. Press down on the logs, flattening them slightly until they are each about 2 inches across the top. Place the second baking sheet under the first. Bake for 30 to 35 minutes, until they are firm to the touch and lightly golden brown. Transfer the pan to a cooling rack and cool completely.
Turn the oven down to 275 and position two racks in the top and bottom of the oven. Carefully transfer the logs to a cutting surface. Use a serrated knife to slice the logs on a slight diagonal. into cookies 3/8 of an inch thick. Line the second baking sheet with parchment. Place the cookies, cut side down on the baking sheets. Toast the cookies in the oven, switching the sheets between the racks and rotating halfway through, 30 to 40 minutes, until dry and lightly tinged with color. Transfer to a cooling rack.
While the cookies are toasting, prepare the finishing sugar. Whisk together the sugar and cinnamon in a medium bowl. As soon as the cookies are out of the oven and on the rack, immediately roll them in the cinnamon and sugar and return to the baking sheets to cool completely.
The cookies will keep in an airtight container at room temperature for up to 2 months.

Friday, June 24, 2011

Fried Golden

This past Easter I was planning the menu, and, of course, on occasions like this I like to try new recipes, but at the same time, I try to take into consideration the fact that a lot of people don't have the same tastes as I do, and may not appreciate something I want to try my hand making. That said, I made a short list of appetizers I could make. I knew we would all be coming back from church and would have an hour to an hour and a half with nothing to eat without them. I don't know about you, but our families tend to be pretty hungry after church, so I felt we needed an appetizer. So, I made a short list, and went over it with my husband. I decided something with mostly advance preparation would be best, so I wouldn't spend a lot of time on that.
We settled on two items:
Golden Ravioli with Arrabbiata Sauce
Arancini di Riso
Now, don't look at the name and think "I won't like that". The first recipe is, essentially, frozen raviolis that are dredged in cornmeal (totally not complicated) and fried. They are served with a spicy marinara. The second recipe is a little more complicated, but amazingly delicious. Mozzarella and risotto balls that are also dredged in cornmeal and fried. I set out a mild marinara, also, because not everybody likes hot stuff. I used my homemade marinara, that I make in large batches and keep in the freezer for such a time as this, and added some Tabasco, cayenne, chipotle powder, and a bit of chili flakes for the spicy. Warmed them both in the microwave just before serving.
One reason I chose these recipes is because my husband's grandfather can't have gluten. The risotto balls are dredged with a tiny bit of flour mixed into the cornmeal, but I omitted it for him. I have to say these appetizers were a huge hit. For about two weeks straight my husband kept asking me to make it again and again, because he knew I had more of the raviolis in the freezer. The risotto balls can be completely made the day ahead, and kept covered with plastic wrap in the fridge. You dredge them just before frying and you have a quick, hot appetizer.
Both of these recipes, with a few minor alterations, can be found in Martha Stewart's Hor d'oeuvres Handbook including a recipe for the arrabbiata sauce.

I am not going to include a recipe for the fried ravioli, just a synopsis. I used grilled chicken and mozzarella raviolis. Thaw (if frozen) in your fridge overnight. Dredge 24 raviolis in about 1/2 cup cornmeal. Heat oil in a deep pot, at about medium-high heat. Fry turning once for 1 to 2 minutes. Drain on a paper towel. Sprinkle with coarsly ground salt.

The risotto balls entail a little more work. You need to start this the day before, or up to two days. Make the risotto, allow it to cool completely, form into balls, and refrigerate until you are ready to fry them.

Arancini di Riso

4 cups chicken stock
1 Tablespoon extra virgin olive oil
2 large shallots, finely chopped
1 cup Arborio rice
1/2 cup white wine (or additional chicken stock)
1 teaspoon kosher salt
Freshly ground black pepper
2 Tablespoons chopped fresh flat leaf parsley
1 ounce Parmesan cheese, finely grated (1/4 cup)
1 ounce mozzarella cheese, cut into 36 1/4-inch cubes (1 oz is the size of a string cheese)
1/2 cup flour (omit for gluten-free recipe)
2 large eggs, lightly beaten
1/2 cup yellow cornmeal
oil for frying

Bring chicken stock to a simmer in a medium saucepan over medium heat. Keep covered and warm on low heat.
heat the olive oil in a medium saucepan over medium heat. Add the shallots and cook until translucent, 2 to 3 minutes. Add the rice to the pan and cook, stirring, until the edges of the rice become translucent, 1 to 2 minutes. Add the wine and cook, stirring, until nearly all the wine is absorbed into the rice, 2 to 3 minutes. Add 1 cup of the stock and 1/2 teaspoon of salt and cook, stirring constantly until nearly  all of the stock is absorbed, 3 to 5 minutes. Continue adding the stock,, 1/2 cup at a time, stirring constantly, until the rice is creamy but still firm, about 20 minutes. Add the remaining 1/2 teaspoon of salt and season with pepper. Stir in the parsley and Parmesan. Remove from the heat and transfer to a large bowl. Allow the rice to cool completely, stirring occasionally. Cover with plastic wrap and refrigerate until firm and thoroughly chilled, 3 to 4 hours or overnight.
Line to baking sheets with parchment. Place 1 Tablespoon of the risotto in the palm of your hand and form it into a shallow cup. Place 1 cube of the cheese in the center of the rice. Enclose the cheese with the risotto to form a ball. Place on the baking sheet. Repeat with remaining risotto. Refrigerate until ready to proceed.
Combine the flour (if using), 1 teaspoon salt, and 1/2 teaspoon of pepper in a shallow bowl. Place the eggs and cornmeal in two separate shallow bowls. roll the risotto balls first in the flour, gently shaking off any excess, then dip into the egg mixture, then lightly coat with cornmeal. Place them on the second baking sheet. The risotto balls can be refrigerated at this stage until ready to fry.
Heat the oil in a large saucepan over medium high heat. Fry until golden, 1 to 2 minutes.

Monday, June 20, 2011

It Can Be Done

One of the reasons I wanted my mom to contribute to my blog is because of her candy-making. I think candy-making is a lost art. When I tell people my mom does it, they stare at me in disbelief. Now, I am not the greatest at candy-making....actually, I am not good at it at all. I know it's possible, because I have seen my mom do it, but it is definitely not my passion, and I need some work in this area.
You may have seen my button on my blog "I took the handmade pledge". If you are not familiar with this concept, it is expressing that I am striving to give, and hoping to receive, only handmade gifts. Of course that will not only work, but it encourages people to support small, local businesses and business owners, and I truly believe it places value on valuable things. Instead of feeling like we have to spend X amount of dollars on family and friends at Christmas, I want to find or make them unique gifts that are special to them.
This is one of those things that makes a great gift. I don't know about you but I love giving and receiving baked/handmade goods at Christmas. I know, sometimes it can be scary...especially if you don't know people, but I feel like it so much more personal and endearing.
Alright....all romanticism aside, here is my mom's recipe:


I enjoy baking and find that most of what I do bake is sweet! If I spend time in the kitchen I’m usually working on something that most people would consider a dessert or treat. When it comes to edible preparations, if I had to choose one thing that I’m passionate about, I would have to say ‘candy-making’.


I love making candy! I love trying new recipes and finding ways to copy-cat a favorite candy that seems impossible to re-create at home! If you follow me around long enough, you’re going to hear me say, “Someone made it, somewhere.” This is just my butchered attempt at explaining that this item doesn’t grow in a garden, or appear by magic....someone, somewhere… made it! I understand that most candy isn’t hand-made any more, but it was at one time. I guess I figure if they can do it, so can I! Usually the worst thing that happens is the item doesn’t look as good as I’d like…..but it always tastes great!

The following recipe is a new one for me, but definitely a keeper!

Peppermint Pattie

1 egg white

4 cups powdered sugar

1/3 cup light corn syrup

½ tsp. peppermint oil or extract

Cornstarch for dusting

1-12oz bag semisweet chocolate chips

1. In medium bowl, beat the egg white until frothy but not stiff. Don’t use a plastic bowl.

2. Slowly add the powdered sugar while blending with an electric mixer on medium speed.

3. Add corn syrup and peppermint oil or extract and knead the mixture with your hands until it has the smooth consistency of dough. Add more powdered sugar if necessary, until mixture is no longer sticky.

4. On a flat surface heavily sprinkled with cornstarch, roll out dough to ¼ inch thickness.

5. Using a cookie cutter or similar circular item measuring 2 ½” in diameter, punch out circles, laying them on a cookie sheet covered with waxed or parchment paper. Refrigerate approximately 45 minutes.

6. Melt chocolate in microwave 30 seconds at a time (2 minutes maximum) until stirred smooth.

7. Take only a few cold candy centers out of the refrigerator at a time. (You may need to work with two trays in order to switch off.)

8. Slide a dinner fork under the cold candy center and submerge the candy into the melted chocolate. (This takes about 1-2 seconds.) Remember to work quickly. The centers will immediately start to soften, then melt, within 3-4 seconds of being in the hot dipping chocolate. Lift out of chocolate, tapping fork 3 to 5 times on side of bowl with fork tines and candy still above the bowl. As you tap you are allowing the dripping chocolate to fall back into bowl.

9. Set your dipped candy on a waxed paper or parchment covered cookie sheet, angling the fork so that the candy slides off onto the paper. You may need to use another fork to ‘help’ slide the candy off, but keep in mind that the more it’s handled, the messier it will look once it has hardened.

10. Chill until firm, about 30 minutes.

11. Store in an air-tight container. I cut a sheet of waxed paper into squares and placed a square between each of the patties as I stacked them into the container. ENJOY!

Thursday, June 16, 2011

A little corny

The recipe I'm writing today is actually on my blog right now. It's in the On the Table, seasonal fruits and veggies section, but I wanted it in the eternal archives.
When my husband and I were first married, I had a copy of Cooking Light magazine. I ran across this recipe, and, as usual, over time the recipe has been altered and changed until it reached the recipe that it is today. It's just an easy topping for corn that is very festive and different. I haven't met anybody who didn't like it, and its just the thing to perk up your summer bbq.
The variations are endless, and even if you're not grilling, you can make this in the oven or just boil the corn and add the topping.

Corn with Citrus Butter
Basic recipe
Grill corn in the husk for about 15 minutes on medium heat, or boil corn on the cob for about 8 minutes (5-10)
Melt 1/2 stick butter, add juice from one lime, 1/2 lemon, salt and pepper, 1/2 teasp. cayenne pepper

Variation 1
add a handful of chopped cilantro

Variation 2
add 1/4 cup grated Parmesan cheese

Variation 3
add about 2 Tablespoons thinly sliced jalapenos to the butter before you melt it

Variation 4
double the lime juice, skip the lemon juice, and add cumin, paprika and cilantro

Monday, June 13, 2011

Crispy, crunchy

I really love reading through cookbooks. If I haven't looked through one in a while, I will just put it on my nightstand, and pick it up when I am trying to get sleepy or waiting to watch a movie. I love cookbooks that have lots of pictures (sad...I know) and who's author shares personal experiences and thoughts. One of my favorite books is Feast by Nigella Lawson. It is really fantastic. She has food for every special occasion you can think of, and an entire chapter devoted to chocolate cakes! You should buy the book just for that!
I love her book because she thinks of food the way I do. Over the top. Large portions. It's fun to eat and make things that are delicious and decadent, but you don't always have time.
That's where this recipe comes in. I was reading through her book...again...and I came across a recipe for crispy pork chops. We like pork chops, but I always ALWAYS make this recipe. It's delicious, and we all love it. It's also great for company, which is another reason I love making it. But when I read this recipe in Nigella's book, I thought...I need to switch up the pork chops a little bit...and as I perused the ingredient list, thinking of how the flavors will go with each other, I began thinking to myself that this dish would be absolutely amazing.
So, I put it on the menu. About a week later, I made it for my family, and it was just as delicious as I thought it would be. I had changed around a few of the ingredients, but if you look at the original recipe it is quite similar.
Another bonus about this meal...its quick. Perfect for a night when you want a quick and easy dinner...especially when there are no kids around, since this is a quick dinner for two. There is a healthy dose of garlic, so eat up and smooch while you both have garlicky breath.

Crunchy Pork Chops

2 8-oz thin-sliced pork chops
1 egg
1 Tablespoon Dijon
½ teaspoon dried, ground oregano
1 cup breadcrumbs
2 Tablespoons Parmesan cheese
1/4 cup oil for frying
3 medium tomatoes
½ clove garlic, minced
1 Tablespoon olive oil
Juice from ½ a lemon
4 cups baby spinach leaves, washed
Combine egg, mustard, oregano, and salt and pepper in a shallow dish. In another dish, combine bread crumbs and Parmesan cheese.
Press the chops into the egg mixture, coating both sides. Then dip the chops into the breadcrumbs, covering them evenly. Let them lie on a wire rack to dry slightly while you heat the oil in a large frying pan. You need to cook the chops until they’re a deep golden color, about 5-7 minutes a side.
Meanwhile, quarter the tomatoes and take out the seeds, then cut them into strips and dice them. Combine diced tomato, minced garlic, oil and lemon juice in a bowl, and add salt and pepper.
When the chops are ready, toss the spinach in the tomato mixture, and divide the salad between two large plates, and place pork chop alongside.

Thursday, June 9, 2011

Warm and Cozy

After much begging, pleading, and promising on my part, my mom has finally decided to share her chicken pot pie recipe. I am so excited because now that I live away from her, I never get to eat it. I have a chicken pot pie recipe that I make, that I like very much, but there is something about that comfort food that you have been eating since a child. I don't like one over the other, it would be like comparing two pieces of art. They are both unique and delicious in their own way.
But I have to say, when I am in the mood for chicken pot pie, I'm in the mood for my mom's. I usually make mine when I am trying to use up leftover chicken. I want my mom's when I want pot pie. Now, I am so glad she has shared the recipe here, so you can enjoy the deliciousness that I have been enjoying.

From Mom: Chicken Pot Pie
This recipe a favorite of mine and has been used in our home for about 25 years! It originally came from my sister, Michelle, who had given it to my Mom. I don’t know where my sister got it, but a few of the ingredients were different and have been changed and adapted over time to suit us. Enjoy!


Chicken Pot Pie

Ingredients list:

Pie crust for top and bottom of pie

1 cooked chicken, with meat cut into bite-sized pieces, or 1-12.5 oz can white chicken meat

2 ½ cups cooked vegetables, cut into bite-sized pieces or 1-12 oz. bag frozen mixed vegetables

6 Tb butter

½ cup flour

½ cup evaporated milk

1 envelope Lipton Soup Secrets dry noodle soup mix

2 ½ cups chicken broth

Directions:

If you are using a fresh chicken, then cook, clean and cut into bite-size pieces, before starting the filling. Set aside. Cook vegetables, draining off water. Melt butter in large pot on low heat. When melted, whisk in the flour, followed by the evaporated milk and dry soup mix, thoroughly mixing each before adding the next. Add broth, chicken and cooked vegetables. Stir and continue cooking on low heat, until filling has thickened. (Appx.5 minutes) Place bottom crust in pie pan. Pour prepared filling into pie pan. Place top crust over filling, sealing edges. Cut at least 3 slits in top of pie. Bake pie at 450* for 25 minutes or until lightly browned.

Monday, June 6, 2011

Little Things

I think its funny when I follow other food blogs and we write about the same things within weeks of each other. I wonder sometimes if its the way our minds work, or if the power of suggestion is so strong that the thought that had been lurking on the edge of my subconscious suddenly lurched to the front after reading the title, and I believe in my heart that I had been intending to write on that.
Well, now it has happened again. Not quite, but close. I had decided a while ago to write about fried rice, but keep putting it off. Other, more exciting things have been visiting our table and I have wanted to write about them instead. I was looking through my blog the other day and realized that I had promised that the recipe for fried rice would be coming soon, so I decided I should write on that. One or two days later another blogger wrote about fried rice. Not the same version as mine, but I still found it funny. Maybe all foodies are on some sort of lunar cycle or something (well...most female foodies are, anyway).
So, let me tell you about fried rice. We love it. I usually make veggie fried rice to accompany our Asian inspired meals, but I have also made it with shrimp, just for fun. I have made fried rice in a wok, and in a pan, and I don't see any difference. For a while, it turned out really great, than I hit a low time when it was just pretty nasty. I mean it tasted good, but the texture was really weird.
I kept switching it up, but nothing really seemed to work. Then I read something in a magazine (I know, happens a lot) and it just clicked. I had been scrambling my egg into the rice, instead of on the side and then combining them. Little thing, right, but it really made a huge difference.
And then, life was good again.
A little tip: When I make Asian food, which calls for small amounts of many different ingredients, I find prep dishes very useful. A great phrase to keep in mind is mise en place which is a French term that essentially means "everything in place". Chop, wash, prep, and measure out everything ahead of time and you will be all set.
Fried Rice
Serves 6

2 Tablespoons toasted sesame oil
2 Tablespoons vegetable oil
1/2 cup mixed vegetables, chopped into 1/4 inch pieces or strips
1 cup shredded cabbage
3 cloves garlic, roughly chopped
2 Tablespoons Teriyaki marinade and sauce
1 teaspoon salt
1/2 teaspoon pepper
2 cups cooked white rice (I love Jasmine rice)
2 eggs
2 scallions (green onions) thinly sliced

Set a pan over medium high heat and add the sesame oil and vegetable oil. When oil is hot add vegetables and cabbage. Saute for about 2 minutes, stirring constantly, then garlic. Saute for one minute more, then add Teriyaki, salt, and pepper. Saute for about 2 minutes more, or until vegetables begin to soften. Add white rice and combine well. Push rice and veggie mixture to one side of the pan. Crack the eggs into the other side, and begin scrambling in the empty side of the pan. Once it is mostly cooked, combine with the rice and veggie mixture. Add scallions. Cook for 1 minute more.
Enjoy!

Thursday, June 2, 2011

Grandma's Cookies (actually...they're DONUTS!!)

I have some very exciting news! My mom has finally agreed to contribute to my blog. I have been encouraging her to write here because we find ourselves drawn to very different new recipes. I have requested many recipes from her, that I hope she finds time to post here, including: Lemonade Pie, Chicken Pot Pie, her amazing toffee and fudge recipes (along with many, many other candy recipes), and many of her goodies. I hope you will enjoy her posts.


After much prompting (from Laurel) and deliberation (from me), I finally decided to go ahead and write a few recipes to be posted on Laurels’ blog. Keep in mind that I am NOT a writer, NOR a chef. I am an ordinary wife and the proud mother of four awesome children, who now are pretty much adults. (The youngest is 17…almost there!) I am also happy to say that thanks to Laurel and her husband, PJ (and more recently my son, Kevin and his wife, Sabrina) I am also ‘GRANDMA’ to four grandsons!!! To quote a song I heard sung by “Mr. Natural California”, Robert Staton, many years ago, “Don’t call me lucky. Call me blessed!”

So now that you are aware of my lack of credentials, I’d like to say that Laurel’s reasoning for having me write on her blog is simply for the fact that my approach to cooking, baking and all things associated with my kitchen, are very different than hers. My Mom was a great cook. There were six of us kids along with my parents and anyone else who happened to be sharing our meal, which was quite often. She could make a great tasting meal, with plenty for all, with a small piece of ground beef the size of a baseball! She was also the queen of ‘meatless’ meals. My favorite memory and consequently still a favorite meal with my family was a pot of slow-cooked pinto beans, fried potatoes and cornbread. Plenty of protein, starch and flavor! We also had breakfast for dinner on many, many occasions.

My Mom’s cooking style developed mostly out of necessity to feed a big group on little money. Her Mother was raised in the South, and she combined this knowledge with her desire to be as up-to-date as possible. Her desire to always keep learning and trying new things never left her, even in her last few year of life. She was always calling me with a new recipe she heard on a cooking show or sending me a clipping of a recipe featuring a new twist on an old classic. Just the very summer she passed away, she had given me a huge box full of cooking magazines, including Bon Appetit, Cooking Pleasures and numerous woman’s magazines along with Martha Stewarts’ Living magazines and Everyday Cooking.

As I recently went through these magazines for any recipes I might find interesting or ‘easy enough’ for me to consider trying, I would find myself chuckling when I went to pull out a recipe, only to find Mom had beat me to it! I would see an awesome looking dessert on the cover, for instance, look up the page number and it was no longer there! No page 72!

Then later that year, after her passing, my Dad told me to take any cookbooks I wanted, since his cooking was done with recipes from memory. So I then inherited several of her hardback cookbooks including A Passion for Chocolate by French chefs Maurice and Jean-Jaques Bernachon, Martha Stewart’s Cooking School- Lessons and Recipes for the Home Cook and Julia Childs’ Baking with Julia.

But THE single most precious recipe collection I inherited was an old black binder. Inside that binder my Mom placed recipe clippings, recipes given to her by others and recipes written by her own hand! Recipes that span more than fifty years of time! Recipes written right after she married my father. Recipes I remember enjoying as a child. Recipes I in turn made for my own family. Some recipes I still enjoy, and others I don’t recall.

It was one of these recipes that caught my attention. A simple recipe for a simple treat. A recipe that in no way encompasses the full scope of Mom’s skill and variety in the kitchen, but a recipe in honor of her and her seemingly over-abundance of talent in regards to her ability to master anything she had set her mind to do. A recipe that I would like to share.

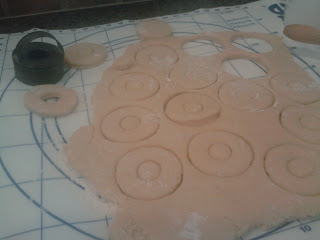
Donuts or ‘Doughnuts’

Yield: 2 dozen

This recipe is for a cake-type donut. No frosting recipes were included on the original recipe card.

4 beaten eggs

2/3 cup sugar

1/3 cup milk

1/3 cup melted butter, cooled

3 ½ cups flour

3 teaspoons baking powder

½ teaspoon salt

2 teaspoons cinnamon

¼ teaspoon nutmeg OR ¼ teaspoon cloves

Mix ingredients in order given. Chill 45 minutes. Roll out to ¼ - 3/8 “ thick. Cut with donut or biscuit cutter. (A donut cutter just has a second, smaller circular cutter in the middle. Fry in hot fat, around 375*, turning once as soon as first side has browned. After side two has browned, remove to paper towel covered plate, to absorb some of the oil. Immediately toss in cinnamon/sugar mixture or powdered sugar to coat. If using chocolate frosting, immediately dip into previously prepared frosting. Add sprinkles immediately, BEFORE the frosting cools or they won’t stick. Let donuts cool slightly so no one is burned and also to allow frosting to set before serving. (Only 1-2 minutes) Best when eaten warm... which means immediately!

Frostings

Cinnamon-Sugar Blend

Combine ½ cup sugar and 2 tsp cinnamon in a quart-size Ziploc bag. Place the still-warm donut inside; close and shake to coat. Place on plate. Continue coating as many donuts as you like. I did about 1/3 of the recipe like this, 1/3 with chocolate frosting and 1/3 with chocolate frosting and sprinkles.

Chocolate Frosting

This is the chocolate frosting you see in my pics. Donuts should be turned topside down and dipped into frosting then turned right side up and placed on plate. Toppings should be added at this time.

½ cup butter

6 tablespoons milk

4 tablespoons cocoa powder

1 teaspoon vanilla extract

3 cups powdered sugar

Heat butter, milk and cocoa powder in a saucepan over low heat. Cook and stir until smooth. Remove from heat; stir in vanilla and powdered sugar; beat until smooth.

Cocoa Glaze

This is much more shiny when set and ends up a darker chocolate color than the chocolate frosting. Donuts should be turned topside down and dipped into frosting; then turned right side up and placed on plate. Toppings should be added at this time.

¼ cup cocoa powder

3 tablespoons light corn syrup

4 teaspoons water

½ teaspoon vanilla extract

1 cup powdered sugar

Combine cocoa, corn syrup and water in small saucepan; cook over medium heat, stirring constantly, until mixture thickens. Remove from heat; blend in vanilla and powdered sugar. Beat until smooth.

Sugar Glaze

This would be what you would normally see on a ‘raised’ donut. (ie: Glazed Donut) A clear, sugar glaze that is normally not used on a cake donut. Donuts should be dipped on both sides while still warm. Place on a wire rack to drain. Toppings should be added at this time.

½ cup water

4 cups powdered sugar

Mix ingredients until smooth.

Candy sprinkle variations:

(1) any chopped nut as long as the pieces are smaller than ½ “.

(2) coconut flakes, raw or toasted

(3)crushed or chopped candy bar pieces (Heath bar, Whoppers, Snickers, Butterfinger, etc.)

(4) whole miniature candies (Mini M & M’s, mini marshmallows, and even though they are a bit large, kids might enjoy Gummi Bears, etc)

(5) kids’ cereals (Trix, Fruity Pebbles, etc.)

(6) Traditional flavor combos like S’mores: Chocolate frosting/mini marshmallows/small broken bits of graham cracker

And the list goes on….. If you try your own variation and you LOVE it, please let us know!

Laurel recently made this recipe and told me she substituted 2 teaspoons of pumpkin pie spice for all three of the listed spices. (Nutmeg, clove and cinnamon) Which makes me wonder about a traditional cream-cheese and powdered sugar based white frosting as a topping……… Hmmmmm. Next time!

http://verygoodrecipes.com/family-challenge

Popular Posts

RECOMMEND US!!